
Showing posts with label Cuppy Cake dress. Show all posts

Wednesday, May 27, 2009

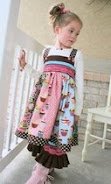
Sewing a Pink Fig Cuppy Cake dress

I've sewn the Pink Fig Cuppy Cake dress more than once & each time felt as if I were creating a bouquet with flowers!
Each panel combines to make the panels next to it prettier, much the same as flowers in a bouquet.

I wanted this particular dress to be soft and feminine. These Daisy Chain and Midwest Modern 2 fabrics were selected. Making the selection is the hard part of creating this dress.

Each panel making up the dress skirt is top stitched. You'll probably want to use the same thread for all top stitching. Be sure select a thread color which will blend well with all of the fabric panels.

My serger sits next to my machine, which allows me to sew the seam, slide to the serger for finishing the raw edges quickly. I laid out the order of my prints, divided them into smaller sections.

Rather than handling a long strip with 16 panels, I had smaller sections to work with & joined them after each section was completed. You don't have to do it that way, but it seemed less cumbersome to me.


This picture shows the skirt panel sections which are ready to be Top Stitched.
My favorite feet for top stitching! They give me confidence!


With the needle in the center of the foot, you are 'Stitching in the Ditch'. With the needle shifted to the right or left of the seam, you can Top Stitch up to 1/8 inch from the seam.


The Cuppy Cake skirt panels are ready to gather and attach to the bodice.

Do not stretch the bodice while sewing the gathered skirt to it.

For tutorial on shirring , see my earlier blog post.
The button placement can be changed for a custom fit.

Bodice fabric: Amy Butler Kaleidoscope Dots-olive

Feel free to contact me if you have questions about the Pink Fig Cuppy Cake pattern.
My first thoughts and musings on this Pattern by designer Chelsea Anderson, can be found on archived post: April, 14 2009.

Friday, May 22, 2009

How to sew with elastic thread. Shirring tutorial


Several people have asked me about sewing with elastic thread , or shirring. There are several patterns out on the market today which uses this technique. Shirring is fun and is quicker than running multiple rows of cased elastic to get the same effect.

Seeing is believing! Close up pictures should take away any fear of working with elastic thread.
Seriously fellow sewers, this is EASY. The elastic thread ...is...uh elastic. It does all the work. You sew and let the thread take care of the rest. :-)

Check SpellingYou'll have to hand wind your bobbin. Not too tight, not too loose. If you wind it too tight it will break. The top thread is standard sewing thread. Use a color which matches the fabric, to best hide any wiggles and wobbles. If you go out of line slightly, don't worry. Sew slowly.
My trusty old Bernina 930 is still alive and kickin! This is the stitch setting I use. I think it is actually called a elastic stitch. I find the stitch width works well between 3.5 and 4 and the length at about 3.5 - 4. Your machine may be different with those settings. Practice on a scrap to see how your settings compare with my sample pictures.

I've sewn samples using a plain straight stitch as well as a plain zig zag. Both work.....because the elastic thread does the real work.
The first row is rather unimpressive. It doesn't start looking drawn up enough until another row is added. The closer you sew the rows, the tighter it draws. Keep that in mind.

The Pink Fig patterns , such as the Cuppy Cake dress and Lily tops, say to sew approx 1/4 -1/2 inch from the first row.
Things start to look good with each additional row.
This is the same sample piece. I stretched it for you to see what the right side looks like. Remember, the top thread is regular sewing thread.
Wrong side of fabric. Stretched to show how the elastic thread looks.
In this sample I used a regular Straight stitch.
Here is the standard zigzag.
Both the straight and standard zig zag seem to pull up tighter. You may want to space the rows out a tiny bit wider if you use these. Chances are, you are sewing on one of those fancy-spancy machines which tells you exactly how to set it up.

Leave yourself about of inch of thread tail to tie off each row. I still back stitch at each end, but I may be breaking the rules by back stitching. Instructions say to tie off.
Once you have sewn all of the shirring rows, make sure you have tied off securely. Take your piece to the steam iron and blast it with some steam. The elastic goes back into shape and looks wonderful.
Step back, and take pride in your handy work!

Tuesday, April 14, 2009

Pink Fig Cuppy Cake is Fun to sew


This was my very first time shirring and it turned out great!
I wrote about shirring in my earlier post. (click here to view)
Now I'd like to share another little tip.

When selecting your fabrics for the panels, avoid using the same fabric for the skirt panels as in the bodice & hem. Look close at the above photo. You will notice two panels which are the same as the band & bodice. I've made two of these dresses and avoided using the polka dots in the skirt because I used it in the bodice / hem.

The ribbon trim helps to "break up" the solid line in those two panels. Having a hard time putting it into words, but the picture tells the story better. Have I confused you?


The pantaloons were made from the Pink Fig Bella pants pattern modified to be shorter.

The bodice and hem are made with Amy Butler Midwest Modern II collection: Happy Dots.

Friday, April 10, 2009

PINK FIG Cuppy Cake dress - How to sew - Shirring


When the Cuppy Cake dress pattern by Pink Fig came out, it was love at first sight! The process of making my choice of fabrics took a little longer.


After reading the pattern details I discovered a scary detail........SHIRRING. Panic struck! My thoughts raced.........I've never sheared a sheep, but thinking about shearing sheep seemed LESS intimidating! I know how to clip an Airedale Terrier......which is the almost like sheep shearing I think. Shirring with elastic thread is completely unknown territory for this gal! Decades of sewing, with absolutely zero shirring!
How did I get by without learning this and when did they invent elastic thread??

The pattern of which I fell in love with was giving me doubts and it was pushed aside for a couple of weeks while I gathered the courage to try the required shirring.
Finally I made the decision for fabrics and purchased the elastic thread.
I chose Amy Butler fabrics from Midwest Modern and Midwest Modern II collections

Once I began cutting the strips and sewing them together knew it would soon become fabulous! Sewing each strip of the Cuppy Cake dress is much like picking wildflowers . Each strip serves to enhance the other as do different flowers in a bouquet!

Measure your child and compare to the size on the pattern details.
Zoey wears a size 5T off the store rack, but is closer to a size 4T for this pattern's size chart.
The Cuppy Cake dress is a very forgiving design because we only need to be concerned about the length of the skirt and bodice size. Making it even better, the bodice has a stretchy back which allows for growing room! (size 12 months to 10 years included in this pattern)
Prepare to sew


I find the quickest way of cutting the strips is by using one strip as my pattern. The fabric-to-fabric eliminates the need for pinning. This seems to be much faster than measuring each time.

Once my strip lengths were sewn together I trimmed any uneven areas.

Chelsea Anderson, the talent behind PinkFig patterns, suggests joining the skirt strips in a circle. The hem band is created by a long piece which is seamed into a circle as well. Next, you would attach the skirt circle to the hem band circle.
I cheat (sorry Chelsea)
With right sides together, I pin the skirt band to the the skirt. Next I sew the side seam from the hem to the top of the skirt. This completes the circle of the skirt. My new serger makes a tidy side seam.
The above picture shows the finished panel ready to be stitched to the dress skirt. (right sides together)
The Shirring - turns out to be easy!

Can I stress again my fear of failing and self humiliation?

Once the skirt was ready, I could not put it off any longer! The completed bodice front , and the bodice back panel laid starring at me! I resisted the urge to kill time by grooming the dog.

Time to hand wind the elastic tread on the bobbin.
Not too tight. Not too loose.

Simply set your machine on a, straight or elastic zigzag stitch. If you've never used this stitch, you'll need to look for it. My Bernina 930 is 24 years old and has had that stitch waiting for this day! It looks like a broken zig zag.
With standard thread on the top and elastic thread on the bobbin, simply stitch the first row.
Now, repeat another row about 1/2 inch from the first. Repeat again. Smile.........you are shirring!!! With each row, the shirring gets more noticeable. Do not worry if your stitch lines have a little wave or two. This won't be easily noticed when complete...... as long as your top thread matches the fabric.

Once all of your rows are done, take it to the ironing board and shoot it with a burst of steam. The steam magically shrinks the shirred panel into a nice, even shape.
This part is so much fun that you may consider summoning your family to watch!

The thread shrinks up into a lovely shaped panel.
Smile again and pat yourself on the back!
For more information on shirring you can go to Pink Fig patterns tutorial.


Pink Fig patterns are wonderfully illustrated & easy to understand. Thank you Chelsea for making it easy for us!
I am itching to get back in front of the sewing machine now! More of my sewing trials & errors soon