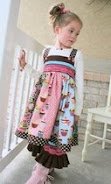
 I've sewn the Pink Fig Cuppy Cake dress more than once & each time felt as if I were creating a bouquet with flowers!
Each panel combines to make the panels next to it prettier, much the same as flowers in a bouquet.
I wanted this particular dress to be soft and feminine. These Daisy Chain and Midwest Modern 2 fabrics were selected. Making the selection is the hard part of creating this dress.
 Each panel making up the dress skirt is top stitched. You'll probably want to use the same thread for all top stitching. Be sure select a thread color which will blend well with all of the fabric panels.
 My serger sits next to my machine, which allows me to sew the seam, slide to the serger for finishing the raw edges quickly. I laid out the order of my prints, divided them into smaller sections.
Rather than handling a long strip with 16 panels, I had smaller sections to work with & joined them after each section was completed. You don't have to do it that way, but it seemed less cumbersome to me.
 This picture shows the skirt panel sections which are ready to be Top Stitched.
 My favorite feet for top stitching! They give me confidence!
 With the needle in the center of the foot, you are 'Stitching in the Ditch'. With the needle shifted to the right or left of the seam, you can Top Stitch up to 1/8 inch from the seam.
The Cuppy Cake skirt panels are ready to gather and attach to the bodice.
 Do not stretch the bodice while sewing the gathered skirt to it.
For tutorial on shirring , see my earlier blog post.
The button placement can be changed for a custom fit.
 Bodice fabric: Amy Butler Kaleidoscope Dots-olive
 Feel free to contact me if you have questions about the Pink Fig Cuppy Cake pattern.
My first thoughts and musings on this Pattern by designer Chelsea Anderson, can be found on archived post: April, 14 2009.


Oh my, this dress is beautiful ! I love the fabric that you used !
ReplyDelete:-) barbara